TC Plate Changer
HowTo use VertigoScan5.3_PC
This page shows how to create a scanning project with VertigoScan5.3_PC.dll
DLL registration
1. See installation page to register VertigoScan5.3_PC.dll, FlexStage5.dll, TecnoCutPlateChanger.dll.
2. Download the latest version of FlexMapX.dll from FlexMapX sw page .
Create a project with TecnoCutPlateChanger
1. Open a previous project (with Vertigoscan5.x , FlexStage4, FlexMapX)

VertigoScan5.3_PC.dll
2. Check if Vertigoscan object is automatically linked to the new library by using the "Object Information" tool (click on the 11th icon and click on VertigoScan icon). The DLL path should be related to the new
module.
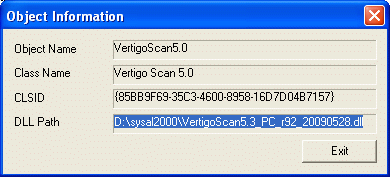
3. Rename the object to VertigoScan5.3_PC (click on th 12th icon and then to VertigoScan icon)
FlexMapX.dll
The new FlexMapX library has different slot names. Please, follow exactly the instructions below.
4. REMOVE the FlexMapX object .
5. UNREGISTER FlexMapX (File->Unregister Class) [DON'T FORGET!!!!!!]
6. REGISTER the latest FlexMapX.dll.
7. Add the FlexMapX object. Rename and configure and connect the object as usual (remember that the connection to the object Data IO is not more necessary).
FlexStage5.dll and TecnoCutPlateChanger.dll
8. Remove the FlexStage4 object.
9. Add, configure and connect FlexStage5 and TCPlateChanger as indicated in the first sw test page .
10. Remember to connect FlexStage5 to VertigoScan5.3_PC and FlexMapx.dll again.
11. CONNECT TecnoCutPlateChanger to both VertigoScan5.3_PC anc FlexMapX.
12. SAVE THE PROJECT NOW (with another name).
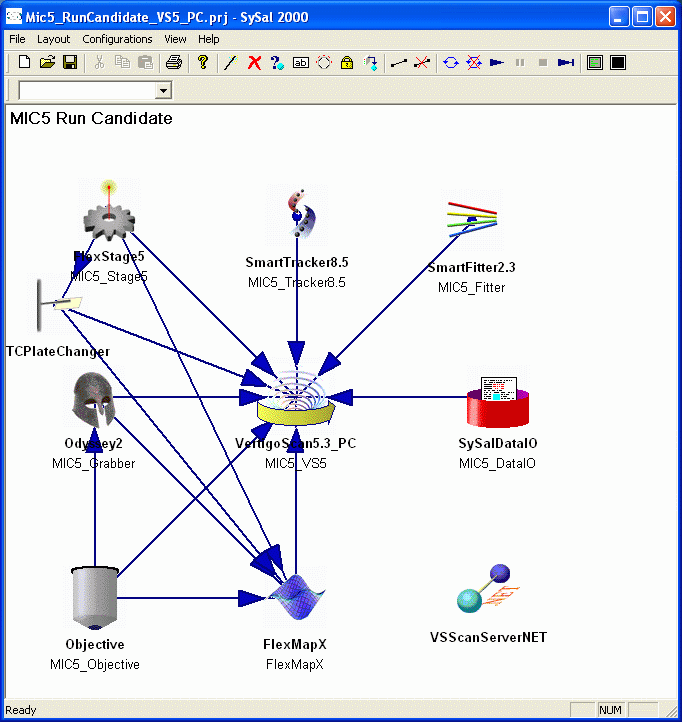
The final layout is
back